The Top 8 Yoga Stretches for Back Pain Relief
If you’re one of the 100 million Americans living with chronic pain, you’re probably ready to try anything. And maybe you even have. But what about yoga? It’s been around for over 4,000 years and is meant to not only bring about physical benefits but mental benefits as well. And let’s face it, if you’ve been living with back pain, you’re probably stressed-out, fed-up or both. Either way, the extra bonus of a little mind calming isn’t going to hurt!
What makes yoga so great for my back anyways?
Many of the postures in yoga gently stretch and strengthen the muscles in the back and abdomen – both of which are essential in helping the body maintain proper upright posture and movement. It’s not exactly rocket science and you’ve probably heard it before, but a strong core will help relieve the stress on your back. Yoga also increases blood circulation, which in turn brings healing nutrients to the injured tissues and joints. It’s a win-win really.
Several of the healing benefits of yoga for people with back pain include:
- Healing injured back muscles
- Speeding the recovery time from an injury
- Helping prevent re-injury
- Helping maintain a regular level of daily activity and avoid disability
Keep this in mind before you start!
When moving through these stretches, listen to your body. They should help you relieve a bit of tension, but the real healing comes from following a comprehensive back-pain relief program. Yoga for Pain Relief takes all of the stretches you’re about to learn and more, and puts them into a 12-week program designed with your pain relief in mind.
Speaking of stretching, if you want an extra bonus – check out these 9 Super Stretches used by over 8,000 people to relieve their pain.
Finally, remember that a stretch may feel a little sore but it should inevitably feel like a release of tension. If you feel a sharp pain, back out of the stretch and move on to the next one or stop until you receive further instructions from your doctor.
Pose #1 Cat/Cow (Marjaiasana/Bitilasana)
Cat-Cow is a gentle flow between two poses that warms the body and brings flexibility to the spine. It stretches the back, hips, and abdomen, and opens the chest, encouraging the breath to become slow and deep. Coordinating this movement with your breathing also relieves stress and calms the mind.

How To:
Start in tabletop position on your hands and knees, then alternate between arching your back and rounding it as you push down on the floor with your hands and tops of your feet. Keep your navel pressed to your spine in both positions to protect your back and reinforce core connection with movement. Pay attention to your breathing – keep it smooth and even.
Pose #2 Child Pose (Balasana)
Child Pose is a common beginner’s yoga pose that is quite calming and often used as a resting position in between more difficult poses. It elongates and stretches the muscles that run along the spine, opening the shoulders to relieve upper back tension and opening the hips to relieve lower back tension. It also reduces the load on the spine, releasing pressure from mid- and lower back.
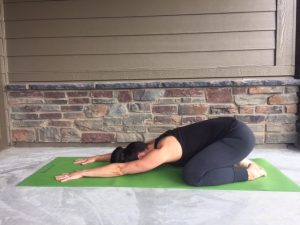
How To:
Begin in a kneeling position. Drop your butt onto your heels as you stretch the rest of your body down and forward, draping your torso between your thighs. Allow your forehead to come to the floor (or block, rolled towel or pillow), while your arms stay long and extended, palms facing down and your stomach rests comfortably between your thighs. Lengthen from your hips to your armpits, and then extend even further through your fingertips. Soften and relax your lower back. Allow all tension in your shoulders, arms, and neck to drain away. Hold for up to a minute or longer, breathing softly.
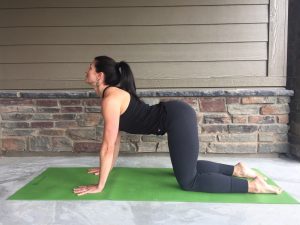
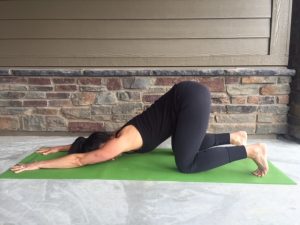
Pose #3 Puppy Dog (Uttana Shishosana)
This is an easier version of the well-known Downward Facing Dog pose, and lengthens the entire spine while supporting the upper body and head. It also begins to decompress the spine and open the hamstrings, which encourages blood flow, and calms the mind.
How To:
On your hands and knees, slowly begin to walk your hands forward, allowing your chest to drop toward the floor. Keep your hips right above your knees and your arms shoulder-width apart, and gently release your forehead to the ground. Activate your arms by pressing into the palms of your hands and lifting your elbows and forearms away from the ground. Draw your shoulder blades onto your back and reach your hips up high toward the ceiling.
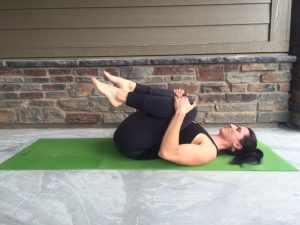
Pose #4 Knees to Chest (Apanasana)
A classic yoga posture, Knees to Chest Pose has many therapeutic benefits. It stretches the lower back, the muscles that run along the spine, glutes, and hamstrings. It also relieves stiffness and pain caused by spinal compression, misalignment or spasm of the lower back. And it releases pent up energy.
How To:
Begin by lying on your back with your legs and arms extended. As you exhale, draw both of your knees to your chest and clasp your hands around them. Keep your back flat on the floor while releasing your shoulder blades down toward your waist and opening up your collarbone. Then draw your tailbone and sacrum down toward the mat, lengthening your spine even more. Tuck your chin slightly, gazing down the center line of your body. Hold for up to one minute, then with an exhalation, release and extend both legs along the floor.
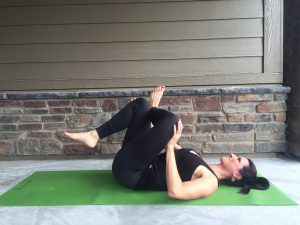
Pose #5 Reclining Pigeon Pose (Supta Eka Pada Rajakapotasana)
This stretch is a modification of the classic Pigeon Pose (done in lunge position). It stretches the spine, hips, and inner thighs, targeting all the muscles that can lead to a tight lower back, and releasing tension from sciatic pain.
How To:
Lie on your back with your knees bent and the soles of your feet on the floor. Cross your right foot over your left knee, with your right knee sticking out to the side. Keep your right foot flexed to maintain the integrity of the knee. Reach behind the hamstring on your left leg and hug it toward your chest as you open your right knee. Hold from 30 seconds to two minutes on each side, depending on flexibility.
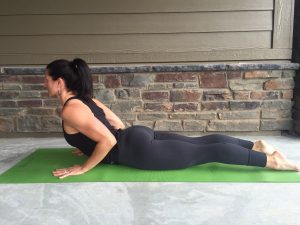
Pose #6 Baby Cobra (Ardha Bhujangasana)
This pose stretches the abdomen and hip flexors, strengthens the back muscles, and improves flexibility and strength in postural muscles. It also opens the heart, taking an emotional weight off the mind, elevating your mood, and helping to reduce anxiety and stress.
How To:
Begin by lying on your stomach with your feet slightly apart. Press the tops of your feet into the mat engaging and lengthening your legs. Then place your palms underneath your shoulders. Tilt your tailbone down toward your heels and tone the low belly. Draw your shoulder blades down and together while starting to pull your chest forward. Keep your elbows bent and close to your body as you press into palms. Look up slightly and breathe here for at least three deep breaths.
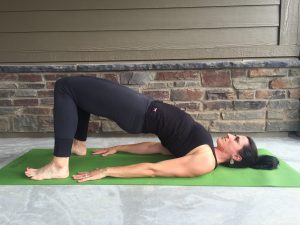
Pose #7 Bridge (Setu Bandha Sarvangasana)
This inversion position relieves pressure on the spine, improves strength in the back, glutes, hips, and hamstrings and improves digestion and circulation. As with a lot of yoga poses, it also helps relieve stress and mild depression.
How To:
Start by lying on your back. Bend both knees and place your feet flat on the floor, hip-width apart. Then slide your arms alongside your body with palms facing down (your fingertips should be lightly touching your heels). Press your feet into the floor, inhale and lift hips up, rolling the spine off the floor. Lightly squeeze your knees together to keep them hip-width apart. Press your arms and shoulders down to lift the chest up. Breathe and hold for 4-8 breaths. To release: exhale and slowly roll the spine back to the floor.
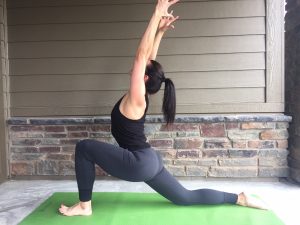
Pose #8 Low Lunge (Anjaneyasana)
The benefits of the Low Lunge Pose are plenty. Not only does it elongate the quads, hip flexors, groin and abdomen but it strengthens the legs, groin and pelvic floor, releases tension and sciatic pain and improves balance and body awareness. All of which allow for proper alignment and dislodging of deep emotions from the hips.
How To:
Start kneeling upright on both knees. Place your right foot in front of you with your knee aligned just behind ankle when upright. Now tilt your tailbone down and lean forward until you feel the muscles stretching in your groin and the front of your left thigh. (The front part of your left foot should be against the floor.) Now inhale while lifting your body and making it upright. Spread your arms to the sides and upwards, trying to lift your pubic bone towards your belly button and pressing your tailbone downwards. Then lift your head up, stretching your fingers towards the ceiling. Hold this position breathing slow and deep then bring your hands down to the floor. Step back into your original position and repeat the stretch for the other side.
Are these poses going to cure my back pain?
Well, it’s a great start! But there is SO MUCH MORE to yoga than these eight poses. I guess that’s why over 20 million people actively practice yoga in the United States – it works. According to The National Center for Complementary and Integrative  Health, “Recent studies in people with chronic low-back pain suggest that a carefully adapted set of yoga poses may help reduce pain and improve function (the ability to walk and move). Studies also suggest that practicing yoga (as well as other forms of regular exercise) might have other health benefits such as reducing heart rate and blood pressure, and may also help relieve anxiety and depression.”
So how do I say goodbye to my back pain for good?
Good question! If you’re ready to eliminate the pain and take your life back, you really should check out Yoga For Pain Relief. It’s a quick and easy pain relief sequence that takes just minutes a day, and for most people it begins to relieve their pain after the first session.

This program is for everyday people from all walks of life – busy moms, stressed-out executives, retired 70 year olds… you name it. It’s for anyone who struggles with physical, mental and emotional pain and needs a plan that can specifically target trigger points – like chronic back pain. And the cherry on top – you can do it anywhere. Yep, the program can be accessed immediately and downloaded to your favorite device. Or if you’re old school, you can get it on DVD. Hey, it never hurts to have a back-up plan. No pun intended of course.